Introduction#
Phew, what a mouthful of a title. There’s a lot to unpack here, so I’ll be breaking it down in this post. I recently came upon the realization that I needed a more reliable (and more available) Android pentesting solution than my old Pixel 2 (fantastic device btw) I had dangling off my Homelab server. As my summer vacation was approaching, I knew that keeping the Pixel 2 connected to my server 24/7 wasn’t feasible if it should ever come disconnected or need to reboot. Thankfully, Android can easily be virtualized (and rooted!), so it was time to let the Pixel 2 have a well-deserved rest and set up a new pentesting environment.
Why Another Proxy Tutorial?#
If you said that there’s many tutorials out there for setting up a proxy to intercept device traffic, you’d be right. However, most of these tutorials make assumptions that are not helpful in my (and possibly your) specific use case. For instance, the tutorials I found online assume that:
- The Android device is connected to WiFi. Android doesn’t let you set a proxy for mobile data or Ethernet (such as a VM uses) easily.
- They don’t intercept Android apps’ HTTPS traffic. Just browser traffic or traffic from apps that don’t use certificate pinning, or apps that you’re developing.
- They require you to modify an app’s xml file to trust the certificate. This is a pain to do for every app you want to intercept traffic from.
So, if you faced the same issues I listed above, then this tutorial is for you. To summarize, this tutorial will show:
- How to Intercept HTTPS traffic from an Android VM without WiFi.
- Intercept
ANYapp’s HTTPS traffic, regardless of certificate pinning. - Automatically handle trusting the certificates.
- Doesn’t require modifying any of the target app’s files.
The Plan#
Initially, I used the Open Source project Android x86 as my Android VM system. However, it turns out that Android x86 project is based on Android 9.0, which is slightly (very) outdated. So after searching online, I found the Bliss OS project, which is based on Android x86. However, Bliss OS supports Android 9 through 13, which is a lot more modern. So I decided to give it a try. (At the time of this writing, I used the Bliss-v16.9.6-x86_64-OFFICIAL-gapps-20240602.iso download).
The next step in the plan was to set up an HTTPS proxy to intercept the traffic. However, this is a little harder to do since installing a trusted root certificate on Android requires a rooted device. Thankfully, Bliss OS comes pre-rooted, so this was solved before it even became a problem. For the proxy, I decided to use HTTP Toolkit since they have an Android app that takes care of trusting user certificates automatically (see how it’s done here). HTTP Toolkit also supports intercepting traffic over ADB. This way I can save all the traffic to my laptop or pc and analyze it later.
Setting Up the VM#
I use Proxmox as my hypervisor, so setting up a new VM wasn’t too difficult. If you need step-by-step instructions to install Bliss OS, I found this fantastic guide that walks you through the process on Proxmox. Once the VM is made, sign in to your Google account and finish setting up the VM. Once I was greeted by the Bliss OS homescreen, here’s what I did next:
- Find your VM’s IP address: Go to
Settings->About tablet->Device status->IP address. - Enable Developer Options: Go to
Settings->About tablet-> TapBuild number7 times. - Enable USB Debugging: Go to
Settings->System->Developer options->USB debugging. - Optional, but I like to enable
Disable adb authorization timeoutinSettings->System->Developer optionsto prevent the authorization dialog from popping up every time you connect to ADB. - Optional, but I also like to enable
Stay awakeinSettings->System->Developer optionsto prevent the screen from turning off.
Bliss OS by default has ADB running on port 5555, so you can now connect to it from your PC.
adb connect <VM IP>:5555
Note: If you’re having trouble connecting to the VM (no route to host but you can ping the IP), make sure that your Wi-Fi network is 2.4 GHz. I spent way too long trying to troubleshoot this issue when I moved and upgraded to a 5 GHz network.
Setting Up HTTP Toolkit#
Now that we have the VM set up and are able to connect to it over ADB, it’s time to set up our proxy. First, download the HTTP Toolkit App (or use your favorite package manager). Once you have it installed, open it up and you’ll be greeted by the Intercept HTTP screen. Next, search for adb to connect through ADB as shown below:
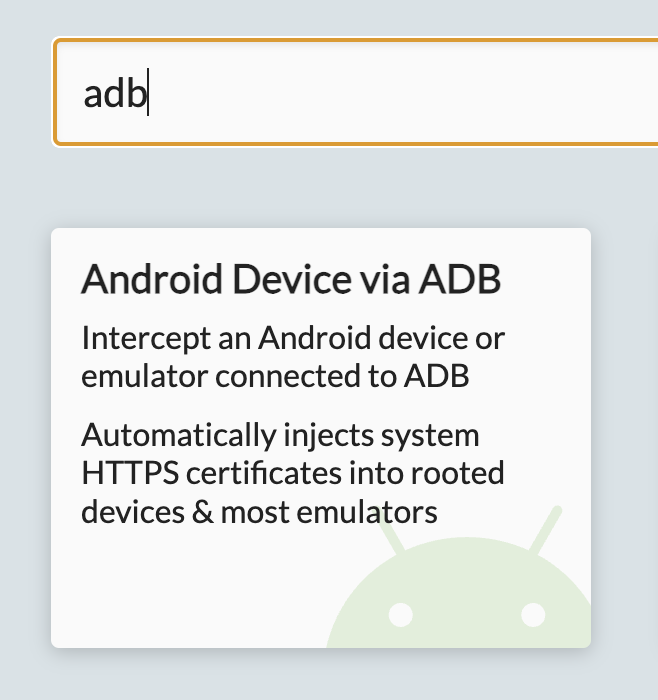
If the ADB option doesn’t show up, make sure that you have ADB installed on your system and that you’ve connected to the Bliss OS VM. Once you’ve connected, you should see a screen like this:
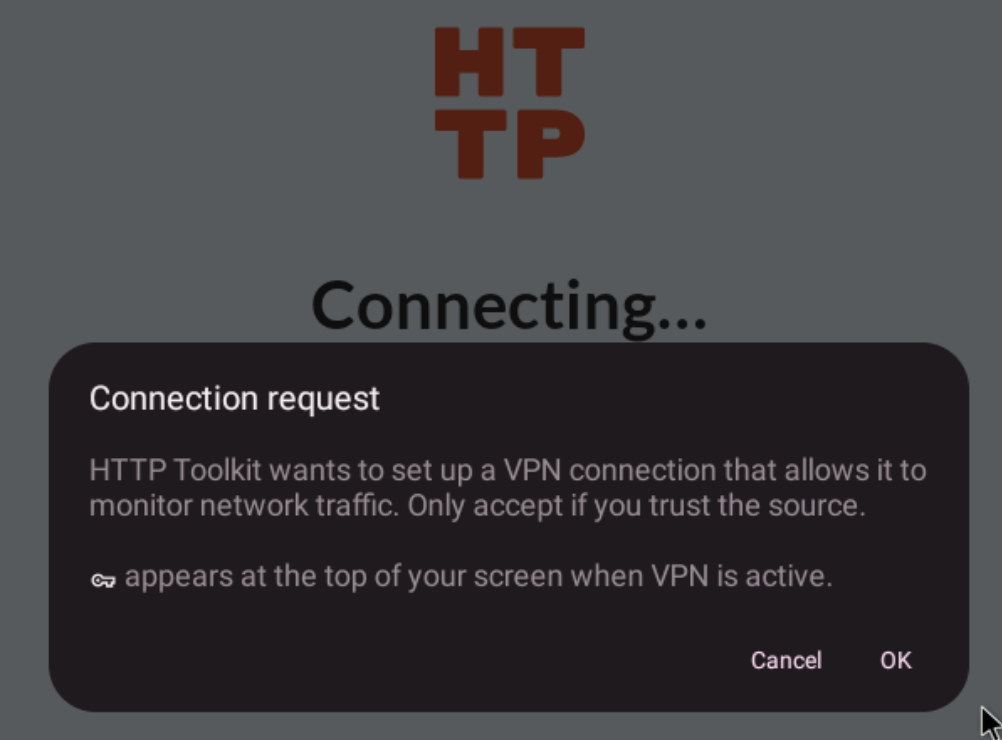
This is the HTTP Toolkit Android app that was automatically installed on the Bliss OS VM. It will handle trusting the certificates for us. Click Ok. You should now see the HTTP Toolkit Android app show success like in Figure 4. If not, it might be that HTTP Toolkit didn’t receive root access. Good thing Bliss OS comes pre-rooted! However, I found that Bliss OS sometimes decides not to display the root access prompt, so you have to manually grant it. To do this, open the KernelSU app, click the “Shield” icon in the middle, then select HTTP Toolkit. Toggle the switch for Superuser access and you should be good to go.
HTTP Toolkit should now configure the certificate and be intercepting HTTPS traffic. You can verify this by seeing two green checkmarks in the HTTP Toolkit Android app, as well as seeing the flood of traffic in the HTTP Toolkit desktop app.
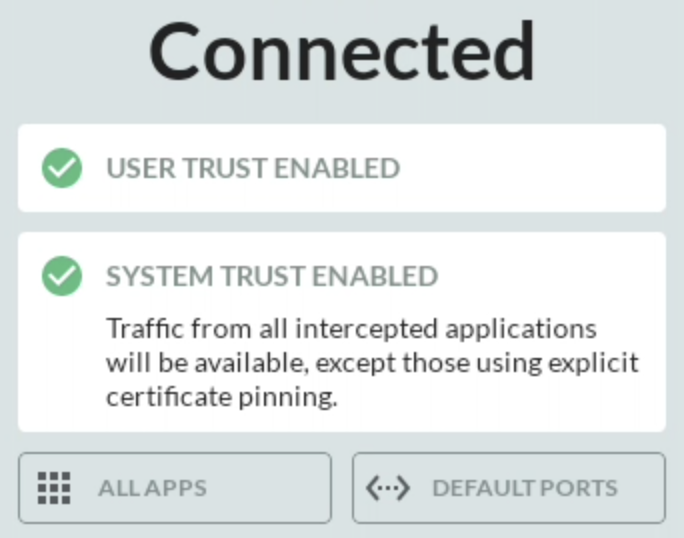
If you’re looking to analyze a specific app’s traffic, you can optionally filter the traffic by selecting the Apps tab in the image above. This will show you all the apps that are currently sending traffic through the proxy. You can then select the app you’re interested in and see only its traffic in the desktop app.
Conclusion and Bonus Tip#
And there you have it! A reliable and always available Android app pentesting environment, waiting and ready for your next big project. And now for a bonus tip: if you want to be able to control the Bliss OS VM from your PC and not have to use the Proxmox console, then should install the scrcpy tool. This is a fantastic project that lets you control your Android device from your PC via ADB. Once you have it installed, then just run:
adb connect <VM IP>:5555
scrcpy
And you should see your Bliss OS VM screen on your PC. This is especially useful if you have multiple VMs running and don’t want to switch between them on the Proxmox console or worry about multiple tabs in your browser.
Time to let the proverbial Pixel 2 rest and let the bliss take over.